· deployment · 13 min read
Magic Release Notes
Just merge your PRs without worrying about release notes. Let GitHub Actions do the work for you by creating a Draft Release and then push to production by clicking a button and get notified on Slack.
Neciu Dan
Hi there, it's Dan, a technical co-founder of an ed-tech startup, internation speaker and Staff Software Engineer, I'm here to share insights on combining
technology and education to solve real problems.
I write about startup challenges, tech innovations, and the Frontend Development.
Subscribe to join me on this journey of transforming education through technology. Want to discuss
Tech, Frontend or Startup life? Let's connect.
We used to have a small annoying problem in my company. I call it small-annoying because it was small enough not to deserve allocated resources to solve, but it was annoying enough to bother me every couple of weeks.
We have a Frontend React Application that communicates to a backend API, a gateway to multiple services, and one main monolithic application.
It’s a standard architecture, so let me know if this has ever happened to you.
You need to do a production release; you last did one about ten days ago, and now that the stars have aligned, you have the perfect window to press the button.
The problem? You have no idea what exactly you are releasing.
And here you can see how annoying this was for me. As I usually was in charge of pushing the deploy button, I had to ensure everything in line to be released was tested, verified, and given the green light to be deployed.
Here is what the process looks like:
First, I check the status of JIRA tickets for Ready for Release and write down the ticket number and title. Then, I go commit by commit in the Frontend React Application, note the JIRA tickets in the title, write them down, and do the same for our Backend Go Application and other services.
Finally, I had a list that looked like this:
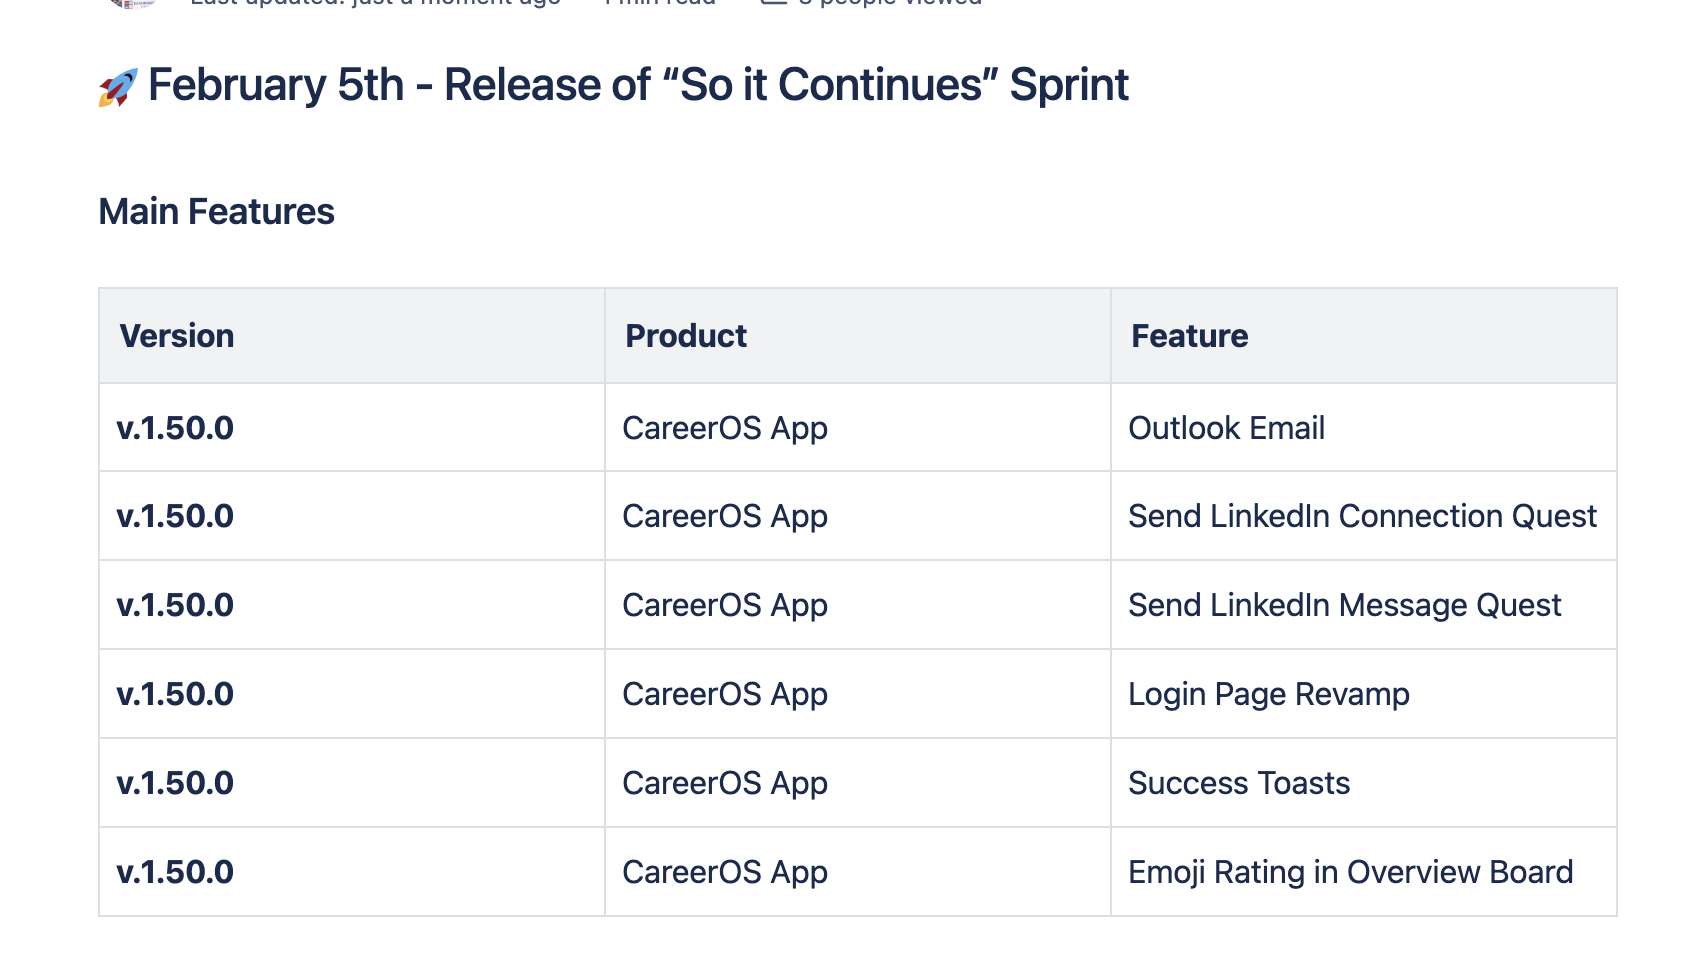
Gathering all this information took me around 30 minutes; like I said, it was a small problem.
Then, I posted on different development Slack channels, letting the team know what was being released and asking anybody with any objections to speak now or face the consequences.
Finally, I would push the button, release the main branch to Production, and let everybody know in the #general Slack channel. We would do some manual tests, everybody would be happy, and a few days later, we would repeat the experience.
Sometimes, the annoyance grows and becomes a real problem. I might forget to announce releases, and stakeholders will be confused about what is in Production. Some bugs might sneak their way because I missed them in the commit list, or worse, dependency deployments might cause the app to crash.
After several times when it became a problem and people complained about it, I finally got around to automating this process.
Here is what I need from this feature:
- Semver versioning
- Github Action that adds the title of PR and content to the changelog when the PR is merged
- A button that creates a new release tag gets everything in the changelog and sets it as the description for the release
- Sends Slack notifications to a specific channel with release notes
Let’s get pull up our sleeves and get to work.
Semantic versioning (aka SemVer)
Not all PRs are the same; some have complex features that took weeks to build, while others have small fixes of current implementations, different chores, or security patches.
This is what semantic versioning represents. It is a series of numbers that lets everybody looking at your project know what the next version has inside of it.
You see it all the time in npm packages. It’s three numbers that are separated by single dots Ex: 1.0.0 :
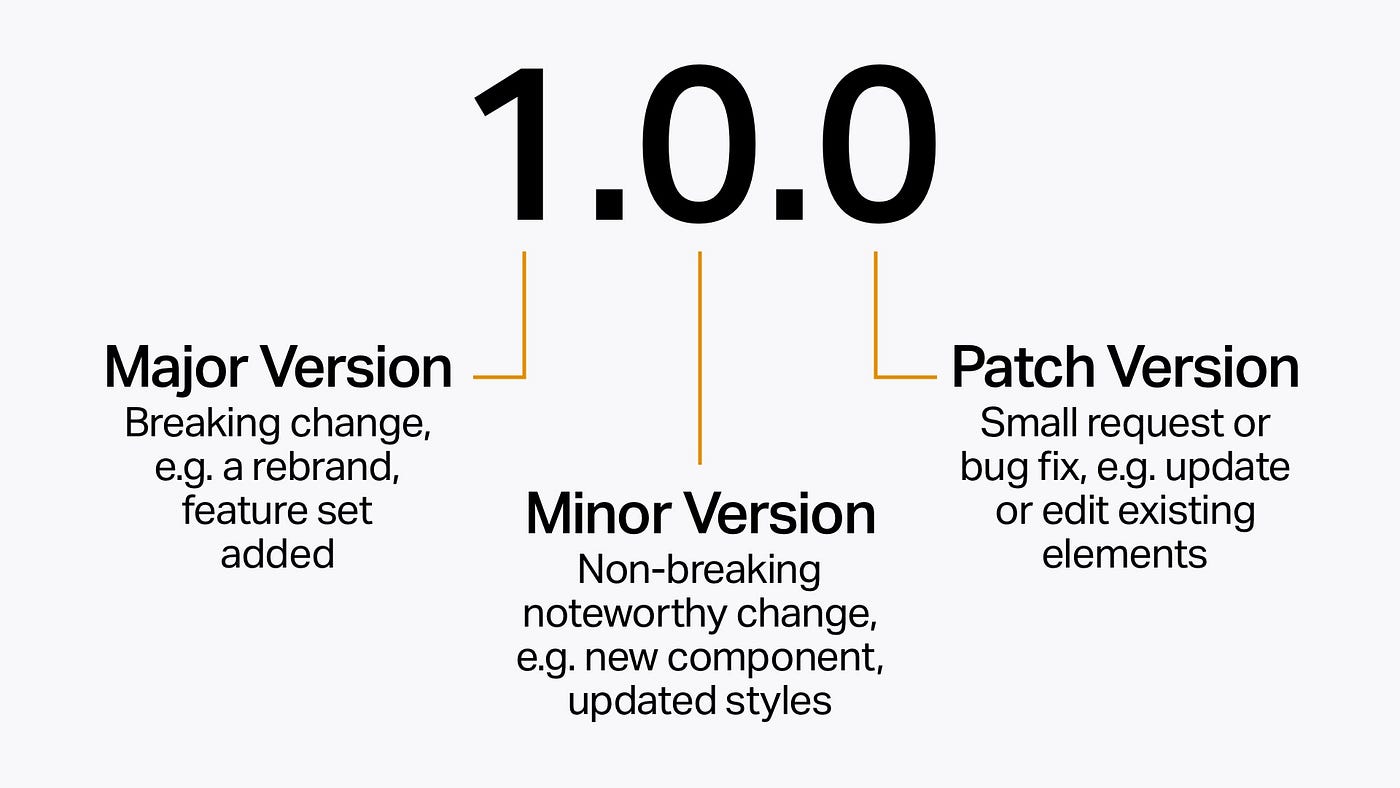
The first number represents a major change containing breaking changes. That means if you use this project and upgrade to this version, you would have to change how you use it for it to work. It’s typical for a rebrand of your project, or you add multiple sets of features or change the API of how your features work.
The second number represents minor versions that add non-breaking changes, such as new features, components, style changes, etc. If I use your project and upgrade to this version, it will work without changing anything in my code.
Lastly, the patch version is the last number, representing quick fixes, security patches, or small improvement requests.
There you have it, SemVer explained. We want this for our release notes; let’s see how we can implement it.
Magic Github Action
Have you ever had those repetitive tasks you do whenever you merge code? GitHub Actions solves those problems. Instead of manually creating tags, updating changelogs, and writing release notes, you set up a workflow file and let GitHub handle it.
It’s like having a tiny dev that sits there watching your repository 24/7, ready to jump in whenever you merge code. Here’s how I configured ours:
We already had the practice of naming our PRs depending on the type of change we are introducing, for example: feat(COM-1000): this is a new feature fix(COM-666): fixed an annoying bug chore(COM-123): updates the README file major(COM-1444): this is a major breaking change that requires both frontend and backend to be carefully deployed, or else we have a problem
The next step was to use this title somewhere, and I knew just the place. GitHub already integrates releases based on tags; the problem is that you have to write the release description yourself.
I decided to write a GitHub Actions script that does the following when you merge a PR:
- Creates a “Draft Release” or takes the one that already exists
- The next version is calculated based on the PR title and the previous tag version, and a tag is created.
- It does this at every PR merge as long you have yet to release it and keeps adding the titles to the Draft Release. Here is what the flow would look like.
We just released version 2.10 in Production yesterday, and today, we’re merging three tickets:
First is fix(COM-666): fixed an annoying bug. The GitHub Action checks the current latest tag (2.10.0) and, since this is a fix, bumps the patch version to 2.10.1. It creates a draft release and adds the PR title under the “Patches” section.
Next, we merge feat(COM-789): add new login page. The Action sees this is a feature, so it bumps the minor version to 2.11.0 and adds the PR title under “Minor Changes” in the same draft release.
Finally, we merge chore(COM-999): update dependencies. Another patch, so it becomes 2.11.1.
Let’s break down how this works in the code. To use this in your project, create a .github folder inside the root of your project (if you don’t have one already); inside it, create a workflow director and add a file named semantic-versioning.yml :
name: Semantic Versioning and Draft Release

on:
  pull_request:
    types: [closed]
    branches:
      - main
This code tells our tiny dev, “Hey, only wake up when someone merges a PR to main.” Because that’s when we want to update our release notes.
jobs:
  process-pr:
    if: github.event.pull_request.merged == true
    runs-on: ubuntu-latest
    permissions:
      contents: write
The if condition is crucial here - we don’t want to create release notes for PRs that were closed without merging. That would be messy. And we need contents: write permission because, well, we’re going to be creating tags and messing with releases.
steps:
  - name: Checkout code
    uses: actions/checkout@v3
    with:
      fetch-depth: 0
      token: ${{ secrets.GITHUB_TOKEN }}
Steps in GitHub Actions are sequential tasks that run one after another. Think of them as recipes—each step needs to be completed successfully before proceeding to the next one. The uses: actions/checkout@v3 tells GitHub to use version 3 of the official checkout action, a pre-built action that handles git clone operations.
The checkout step clones our repository into the GitHub Actions runner. The workflow needs access to our code to process tags and create releases, which is where the GITHUB_TOKEN comes in - it’s an automatically generated token that GitHub creates for each workflow run with the permissions we specified earlier.
GitHub Actions fetches the latest commit by default to save time and bandwidth. But for versioning, we need the complete git history, including all tags. That’s what fetch-depth: 0 does - it tells git to fetch everything.
Then we get in the meat of our business: first, it fetches the latest version tag:
- name: Get latest tag
  run: |
    git fetch --tags
    LATEST_TAG=$(git tag -l | sort -V | tail -n 1)
Then comes the interesting part - determining the version bump based on the PR title:
if [[ $PR_TITLE == *"BREAKING CHANGE"* ]] || [[ $PR_TITLE == *"major"* ]]; then
  BUMP_TYPE="major"
elif [[ $PR_TITLE == *"feat:"* ]] || [[ $PR_TITLE == *"minor"* ]]; then
  BUMP_TYPE="minor"
elif [[ $PR_TITLE == *"fix:"* ]] || [[ $PR_TITLE == *"patch"* ]]; then
  BUMP_TYPE="patch"
fi
It looks for keywords in the PR title - “BREAKING CHANGE” or “major” bumps the major version, “feat:” bumps minor, and “fix:” bumps patch. The version is calculated by splitting the current version and incrementing the correct number:
case $BUMP_TYPE in
  major)
    NEW_VERSION="$((MAJOR + 1)).0.0"
    ;;
  minor)
    NEW_VERSION="${MAJOR}.$((MINOR + 1)).0"
    ;;
  patch)
    NEW_VERSION="${MAJOR}.${MINOR}.$((PATCH + 1))"
    ;;
esac
Finally, it updates the draft release by adding the PR title under the right section (Breaking Changes, Minor Changes, or Patches). If no draft exists, it creates one:
if gh release view "Latest Release" --json body &>/dev/null; then
  CURRENT_BODY=$(gh release view "Latest Release" --json body -q '.body')
  NEW_BODY=$(update_release_body "$CURRENT_BODY" "$SECTION" "${{ env.PR_ENTRY }}")
  echo "$NEW_BODY" | gh release edit "Latest Release" --draft --notes-file -
else
  NEW_BODY=$(update_release_body "" "$SECTION" "${{ env.PR_ENTRY }}")
  echo "$NEW_BODY" | gh release create "Latest Release" --draft --title "Latest Release" --notes-file -
fi
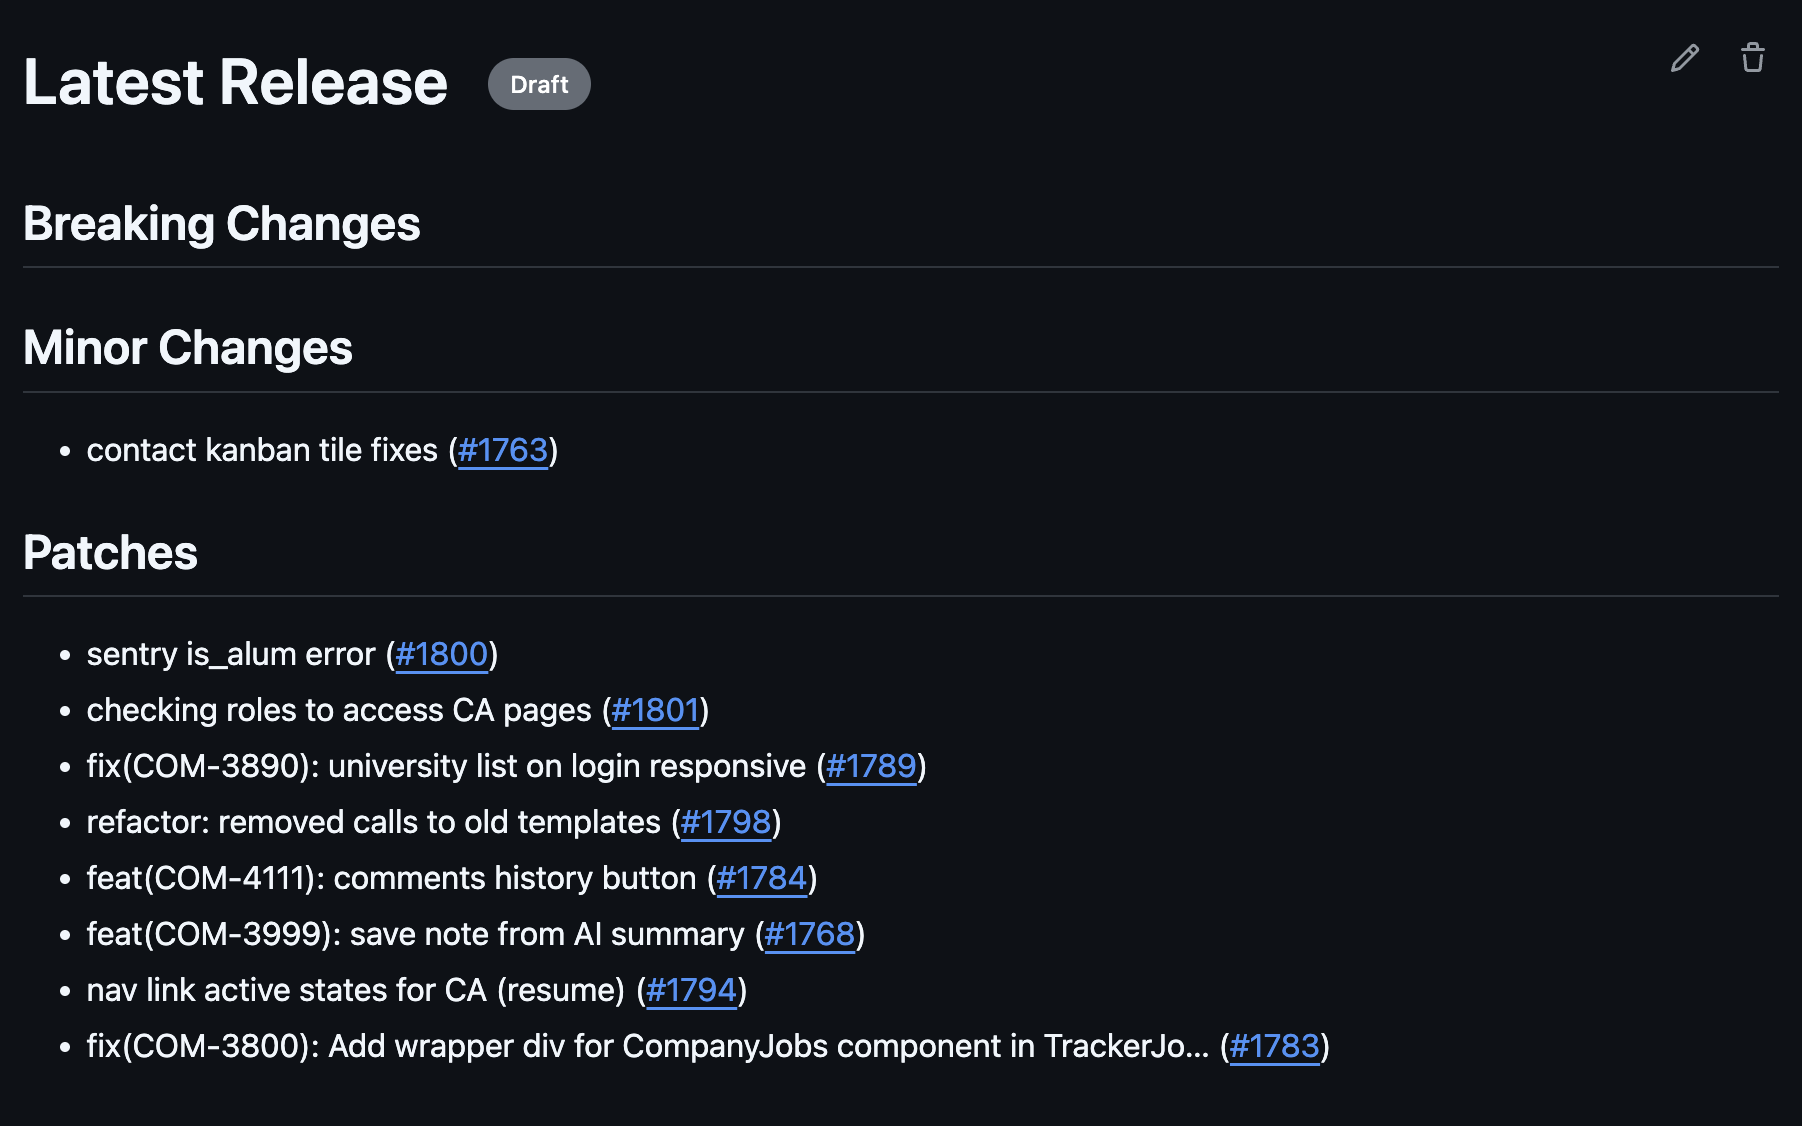
Now, whenever someone merges a PR, the release notes are written by themselves. The draft release keeps collecting changes until we’re ready to publish it to Production. Here is what it looks like:
Pressing the button
Now that we have a Draft Release, we are always aware of what is in the main, and we can deploy it anytime.
Of course, you can do it manually by publishing the draft release, but I wanted to add some extra things when a release is published.
Remember semantic versioning? I want the GitHub Action to get the latest tag and name the release with that tag. Then, I want to change the version in our package.json file to that specific version. Finally, I want our GitHub Action to create a release branch from our main branch, which we can use to deploy to Production automatically.
Let’s implement this new flow.
First, we create another workflow called publish-release.yml in our workflows folder. This one is a little different, as we don’t want it to run automatically; we have to specify its manual:
name: Create Release Branch and Release

on:
  workflow_dispatch:
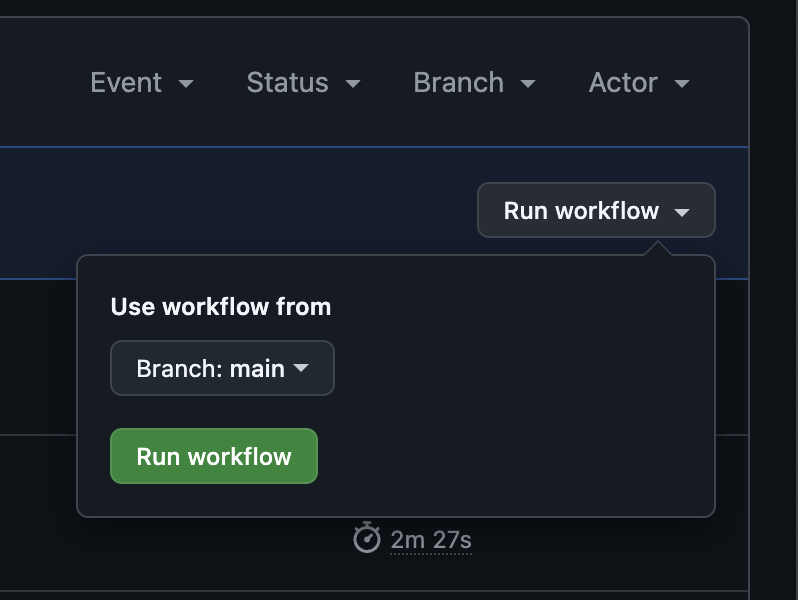
This code will create a nice green button in the GitHub Actions tab that, when pressed, will run our GitHub Action like so:
We break our workflow into three main steps:
- prepare step
- create-release-branch
- publish-release
Our prepare step is pretty standard. It gets the code from our code repository, declares our output, and sets the GitHub token to allow our workflow to push changes to it. Finally, it gets the latest tag of our repo and stores it as a variable for later usage.
jobs:
  prepare:
    runs-on: ubuntu-latest
    outputs:
      latest_tag: ${{ steps.get_tag.outputs.tag }}
    steps:
 - name: Checkout code
        uses: actions/checkout@v3
        with:
          fetch-depth: 0
          token: ${{ secrets.GITHUB_TOKEN }}
- name: Get latest tag
        id: get_tag
        run: |
          LATEST_TAG=$(git tag -l | sort -V | tail -n 1)
          echo "tag=$LATEST_TAG" >> $GITHUB_OUTPUT
Next, our create-release-branch job needs write permissions to the repository. It deletes the current release branch because we no longer need it and creates a new release branch from the main branch.
With the release branch created, it writes the latest tag into the package.json and finally pushes the changes to the repository.
  create-release-branch:
    needs: prepare
    runs-on: ubuntu-latest
    permissions:
      contents: write
    steps:
 - uses: actions/checkout@v4
        with:
          ref: main
          token: ${{ secrets.GITHUB_TOKEN }}

 - name: Update package version and create branch
        run: |
          # Get the latest tag
          LATEST_TAG=${{ needs.prepare.outputs.latest_tag }}

          # Delete release branch locally and remotely if it exists
          git push origin --delete release || true
          git branch -D release || true

          # Create new release branch from main
          git checkout -b release

          # Update version in package.json directly
          jq ".version = \"${LATEST_TAG}\"" package.json > temp.json && mv temp.json package.json

          echo "Updated package.json to version ${LATEST_TAG}"
          cat package.json | grep version

          # Configure git
          git config user.name "github-actions[bot]"
          git config user.email "github-actions[bot]@users.noreply.github.com"

          # Commit and push changes
          git add package.json
          git commit -m "chore: update version to ${LATEST_TAG}"
          git push -f origin release
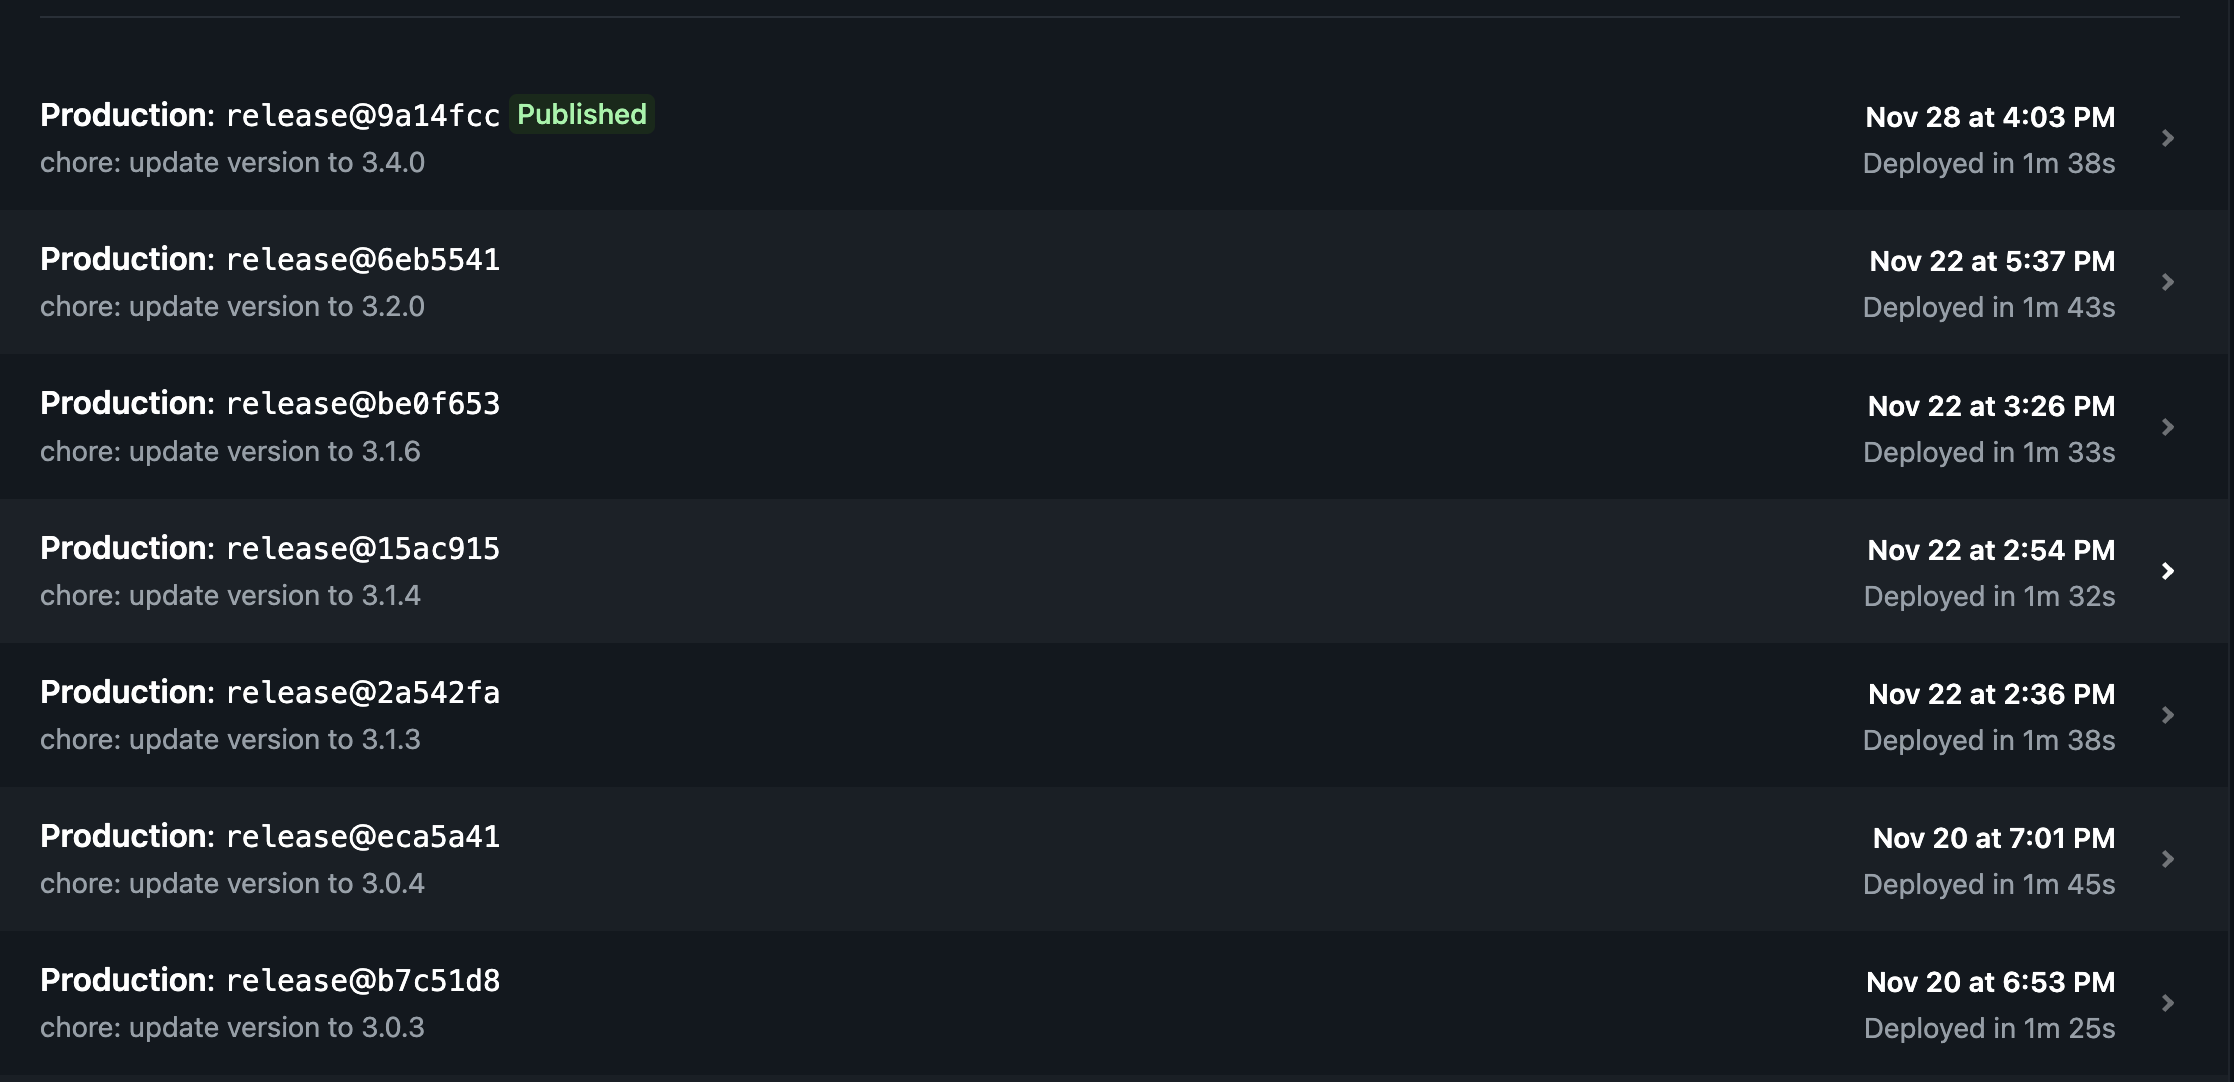
What we have now is a branch named release with the latest commit and the version name. We can then use this in our CI/CD Netlify or Vercel or whatever Cloud provider you want to automatically release this branch to Production every time some new code is pushed to it.
And now, finally, if the previous two jobs were successful, we can publish our release with the adequately named job publish-release:
  publish-release:
    needs: [prepare, create-release-branch]
    runs-on: ubuntu-latest
    permissions:
      contents: write
    steps:
 - name: Checkout code
        uses: actions/checkout@v3
        with:
          fetch-depth: 0
          token: ${{ secrets.GITHUB_TOKEN }}

 - name: Publish draft release
        env:
          GITHUB_TOKEN: ${{ secrets.GITHUB_TOKEN }}
        run: |
          # Use the tag from prepare job
          LATEST_TAG=${{ needs.prepare.outputs.latest_tag }}

          # Update the draft release title and publish it
          gh release edit "Latest Release" --title "$LATEST_TAG" --tag "$LATEST_TAG" --draft=false
There you have it: click a button, and magic happens. This will publish the release to the latest version so you can see it in the releases tab on GitHub and start again with more PR merges.
Getting Notified
The final piece of the puzzle was getting these release notes to where people actually hang out - Slack. You know how it goes, you can have the most beautiful documentation in the world, but if people need to actively go looking for it, they probably won’t.
Let me tell you about the easiest integration I’ve ever done.
First, head over to https://slack.github.com/ and install the GitHub-Slack app. It’s the official app, so you know it’s safe and well-maintained.
Next, you’ll want to create some dedicated channels for these notifications. In our case, we created two: #frontend-releases and #backend-releases.
Finally, here’s the magic part. Go to your new channel and type this command:
/github subscribe owner/repo releasesJust replace “owner” and “repo” with your actual GitHub details. For example, if your repo lives at https://github.com/cst2989/release-notes, you’d type:
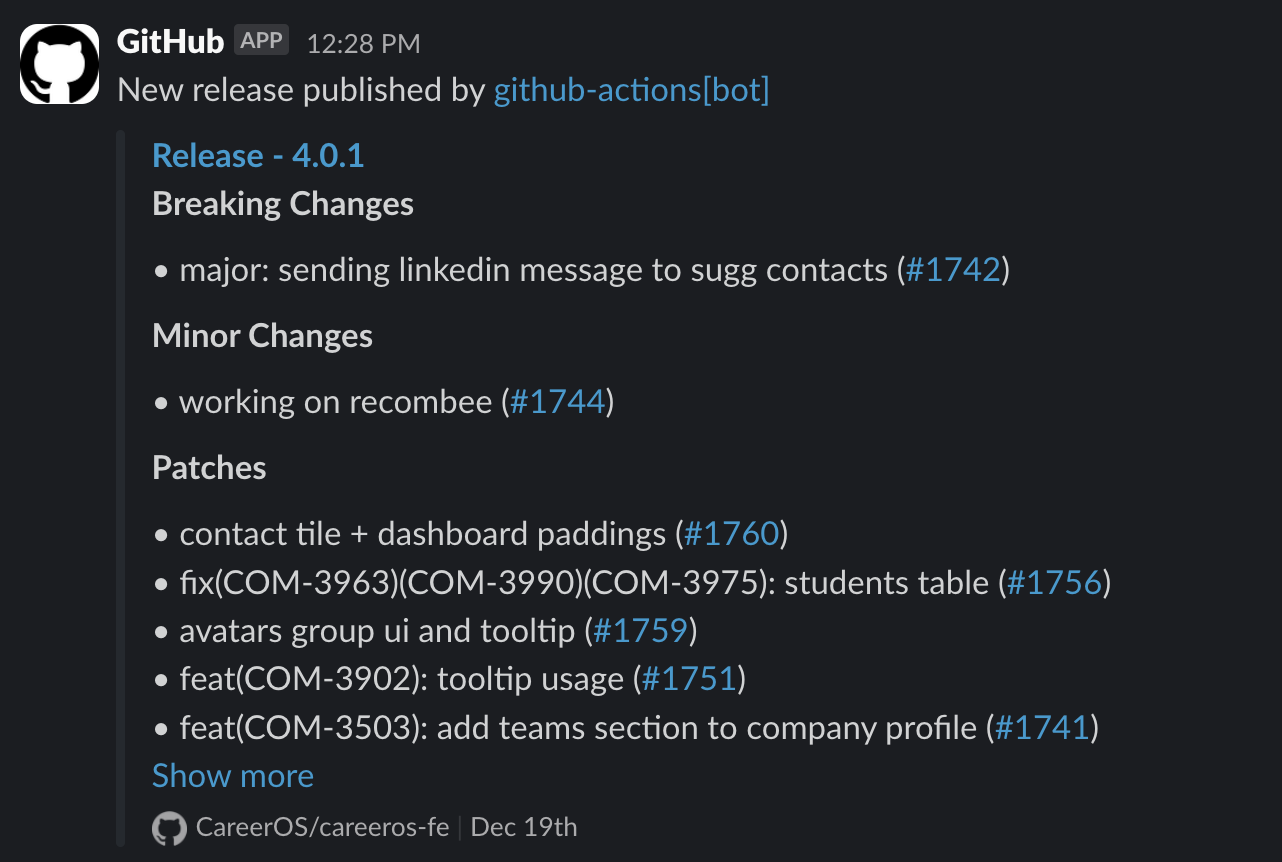
/github subscribe cst2989/release-notes releasesThat’s it! Every time you publish a release, Slack will automatically post the release notes in your channel. There are no webhooks to configure or custom integrations to maintain, just instant notifications where your team already lives.
And remember those beautifully formatted release notes we set up earlier? They’ll show up in Slack looking just as clean and organized. Your team will always know exactly what’s going into Production, and more importantly, they’ll actually see it.
Conclusion and Alternatives
If you want to keep track of all the PRs you are merging in a clean way, you can use the GitHub Actions above to automate your release notes.
Doing this will save you time, reduce human error, and keep your team informed about what’s going into Production.
I would also reccomend an open source Github Action you can find on the marketplace called release-drafter https://github.com/release-drafter/release-drafter that does the same thing but with a little more configuration and it allows to create templates.


