· react native · 6 min read
5 Tips to Solve Common Pitfalls With React Native
Common issues I encountered when building mobile apps with React Native and how I solved them
Neciu Dan
Hi there, it's Dan, a technical co-founder of an ed-tech startup, internation speaker and Staff Software Engineer, I'm here to share insights on combining
technology and education to solve real problems.
I write about startup challenges, tech innovations, and the Frontend Development.
Subscribe to join me on this journey of transforming education through technology. Want to discuss
Tech, Frontend or Startup life? Let's connect.

The world of mobile development has expanded in recent years, going from being proprietary to Android and Swift developers to the fast pace world of Javascript with Hybrid Frameworks like Ionic or Native frameworks like React Native.
React Native is an open-source UI software framework created by Meta Platforms, Inc. It is used to develop applications for Android, Android TV, iOS, macOS, tvOS, Web, Windows and UWP by enabling developers to use the React framework along with native platform capabilities.
When using React Native, you might encounter issues that are difficult to solve or find an answer to, mostly because the React Native community and ecosystem are not as big as other Javascript communities like React or Vue.
In this article, you will learn from my experience of how I solved some common React Native issues or implemented some tricky features.
1. Apple Connect Store Screenshots
Apple Store Review Process When building apps with React Native you might be using a simulator to test your apps, rather than a physical device.
Like me, you might be surprised how difficult is to use Xcode Simulator to create the screenshots of the right size and density for the App Store.
In Google Play the process was straightforward and uploading screenshots you made in any simulator worked great, but for the Apple store, I could not get the dimensions right.
For a 6.5’’ iPhone they were asking for either 2688x1242 or 2778x1284. I tried all sorts of options and device emulators to achieve this … but with no success. Finally, I found the correct answer here.
Here is what you have to do:
- Set simulator to physical size: Window > Physical Size (Shortcut: command + 1)
- Set High-Quality Graphics: Debug > Graphics Quality Override > High Quality
- For a 6.5’’ iPhone use any Pro iPhone. I used 11 Pro
- For 5.5’’ iPhone use iPhone 8+ simulator.
- For Ipad Pro (3rd / 2nd gen) use Simulator iPad Pro (12.9-inch) (3rd generation)
2. The trouble with Fonts
By default React Native uses the standard font for each platform, which means ‘Roboto’ for Android and ‘San Francisco’ for iOS. Designers, however, usually like to use different fonts that fit the overall design of the app.
If you are lucky and the font is a Google Font, that’s great! You can use the package expo-google-fonts.
After installing the package, expo install expo-google-fonts , all you have to do is this:

Here we are importing the fonts and making sure they are loaded before starting the app, then you can easily use it in your stylesheet like this:
fontFamily: 'Lato_400Regular'One issue that I had with expo-google-fonts was when I imported by mistake the entire project, which loaded all the fonts, and not just the Lato font, like this:
import { Lato_400Regular } from '@expo-google-fonts/dev';This will work without problems on web-view, or in the Android simulator, but for iPhones, it will try to load all the fonts at once and it will crash the app because of memory limits.
So make sure you are importing only the fonts you need like this:
import { Lato_400Regular } from '@expo-google-fonts/lato'; 3. Local Storage and Cookies on Mobile Devices
Having a Front End programming background, I’m used to abusing cookies and local storage for almost anything.
Need to save some user information for later use? Cookies! What about this request that barely changes … where can I cache it? Local Storage!
So here I was taking it for granted and adding my bearer token used for Authorization and User Information Object to Local Storage. Only when I started testing in emulators, did I realize that the token was not persisted and I was making every request with an empty Bearer string.
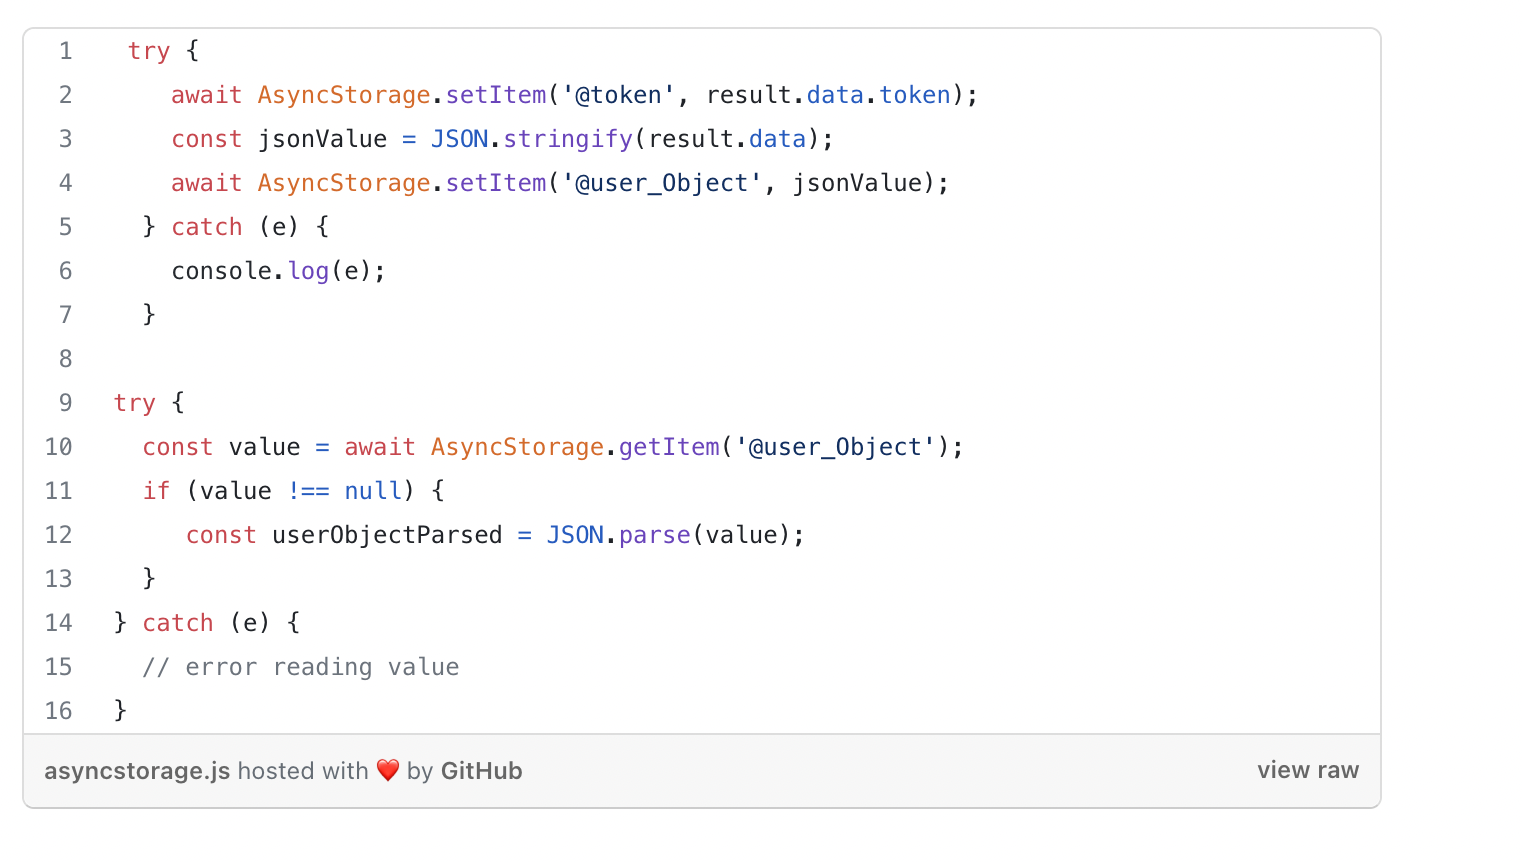
A quick internet search got me to the most used package in this situation: react-native-async-storage/async-storage.
After installing the package, expo install react-native-async-storage/async-storage using it is as easy as normal local storage.

Pay close attention to JSON.stringify() and JSON.parse() functions. If you try to pass JSON instead of a string to the AsyncStorage.setItem() function, your app again is going to work on the web and even in the simulator but it will break in production and crash your app.
And debugging this issue can be quite troublesome, so having a quick check to stringify and parse by default can become good practice and save you from pain in the future.
4. Rendering HTML

You can hardcode texts in your application, but then whenever you want to change a text you have to go through the process of creating new builds for your app and submitting it on the app store again.
Worse, some users may have automatic updates disabled for your app and will never get the new version. To overcome this, you should always send your not-common texts through the API.
But even if you send your text through some request, what about dynamic content? What if you have articles or content with rich descriptions. In your backend, you may have a rich text editor so you can add headings and format your text to your desire, but in the app, you need a way to render that HTML into native Views.

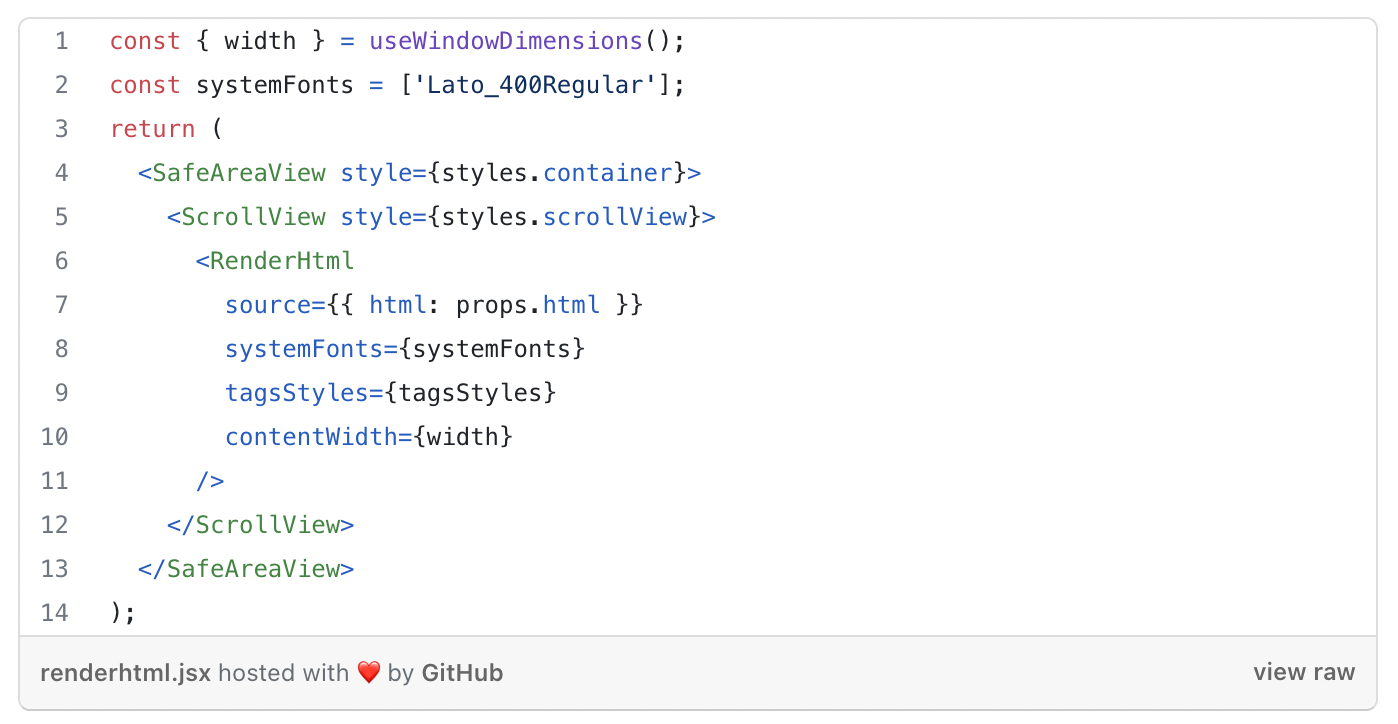
To accomplish this you can use react-native-render-html. An iOS/Android pure javascript react-native component that renders your HTML into 100% native views.
Using it is very straightforward. It also has a prop to inject your fonts called systemFonts, as seen above.
The tagStyles prop can be used to style the HTML content. Here is a short demo to see it in action.
5. Short-circuit evaluations (&&)
One of my blunders coming from the React Ecosystem was my over-attachment to the && operator when rendering components.
{isFetching && <Loading />}And this worked great until I made the mistake of using non-Boolean values as the first operand like this:
{users.length && <User />}This worked great in normal React and did not break at all in the web view of the project, worse yet it also worked on emulators for Android and iOS.
But in Production whenever a user entered a View with this kind of logic the app crashed with this error:
Error: Text strings must be rendered within a <Text> component.This makes sense, if your users array was bigger than 0, React Native wanted to render the number and because it wasn’t in a
I recommend being careful when using the logical operator && to shortcut rendering, especially when dealing with non-string values.
For now, the React Native community is growing, there are a lot of good packages out there to help you on your journey.
But it has not yet reached Javascript levels of fame, which you can tell by the number of resources available to you.
I sincerely hope this article helps aspiring React Native developers with their struggles or convinces engineers from the React ecosystem to try it out and build a couple of mobile apps.


